Most podcasters don’t quit because they run out of things to say. They quit because a single episode turns into a half-day production process. Here’s my podcast setup that makes the whole process way easier, today.
If you’re spending more time fighting your podcast equipment than having meaningful conversations, the problem usually isn’t your talent. More often, it comes down to your podcast setup and the workflow behind it.
The good news is that you don’t need a complicated studio or expensive gear to start a professional podcast. With the right podcast setup and a repeatable process, you can record, edit, and publish high-quality interviews in less time while staying consistent.
Key Takeaways in My Podcast Setup and Workflow
- You don’t need expensive gear to start. A simple mic and a laptop are enough to prove your show has legs.
- The microphone matters, but your room matters even more. Bad acoustics will ruin your sound quality, making pricey gear sound mediocre.
- Recording interviews locally beats Zoom audio every time because each person saves full-quality audio files on their own device.
- A repeatable workflow matters more than a perfect podcast setup. That’s what gets episodes published on time.
- One good podcast interview can become a full episode, social clips, a transcript, show notes, a blog post, and newsletter copy.
Record, Edit, and Publish Podcasts in One Place with Riverside

Stop juggling multiple tools every time you produce an episode. Riverside helps podcasters record local audio and video, generate AI-powered transcripts, create social clips, and publish content from a single streamlined platform. Get 1 free month of Riverside with the code RYAN 👇
My Early Podcast Setup Mistakes That Cost Time and Money
I started the same way a lot of people do: a cheap USB microphone, a laptop, and a quiet corner in my bedroom with my fingers crossed. My first setup was a $45 used Blue Yeti from Facebook Marketplace, recording straight into a MacBook while hoping my upstairs neighbor would stop stomping around and the car alarm outside would choose a different day.
That setup was rough, but it was enough to get moving. In the early days, starting is the most important step.
Why a $45 USB Mic Was Good Enough to Start
A basic USB microphone can do a lot more work than people give it credit for. If the choice is between buying a used mic and actually publishing episodes, or spending three months researching best setup videos while recording nothing, the cheap mic wins every time.
That early setup did exactly what it needed to do. It let the show exist, helped me practice interviewing, and allowed me to learn pacing while figuring out if I even enjoyed podcasting enough to keep doing it.
If you are still in that stage, my comprehensive guide on starting a podcast will help you think through the rest of the moving pieces without overcomplicating your process.
What Went Wrong With the Expensive Mic Upgrade
Then I made a classic mistake. The show started gaining traction, so I purchased the dynamic microphone that every podcaster on YouTube seemed to worship, the Shure SM7B.
At the time, that mic cost about $500. I plugged it directly into my computer, hit record, and was met with weak audio that sounded much quieter than I expected.
That led to a follow up purchase: a Focusrite Scarlett audio interface. It cost me another couple hundred bucks and brought the added frustration of learning how to use gear I did not fully understand yet. This is where many creators burn money, buying professional-level gear before they have a professional-level reason to justify it.
Dynamic vs Condenser Microphones
It is important to understand why my upgrade felt like a hurdle rather than a win. Most beginners start with a condenser microphone, which is highly sensitive and picks up every detail of your room.
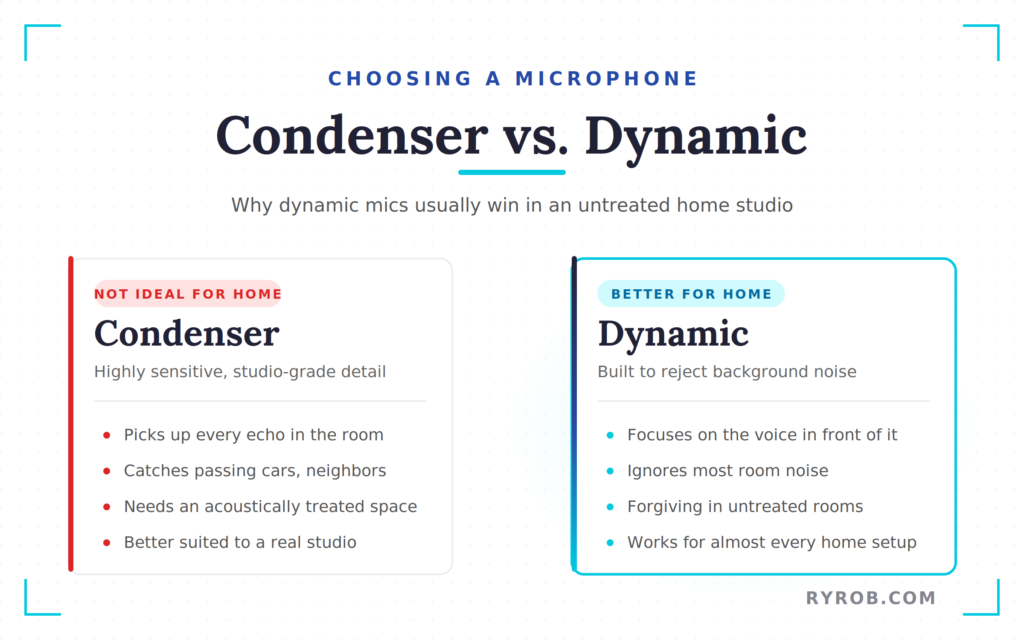
If you are recording in an untreated home studio, a condenser microphone will capture every echo and passing car. A dynamic microphone is generally a better choice for home environments because it is designed to reject background noise and focus strictly on your voice.
The Biggest Lesson I Learned About Podcasting
The expensive setup did not fix the real bottleneck in my production. My problem was never that I needed a fancier microphone. My problem was that I needed a workflow I could repeat every single week without dreading the process.
A simple setup you can use consistently will beat a premium setup you avoid using.
That realization was my turning point. Once I stopped chasing gear and started fixing my process, podcasting became faster, less stressful, and a whole lot easier to sustain long term.
The Podcast Setup That Keeps Production Under 2 Hours
The setup I use today is boring in the best possible way. It works, it travels well, and it does not require an audio engineering side quest.
At home, the core of it includes:
Put together, you are looking at roughly $200 to $400 depending on what you already own. You can get 1 free month using the code RYAN when you try Riverside with my creator link.
The Only Gear Worth Upgrading First
If there is one piece of hardware worth caring about first, it is the mic. The Shure MV7 hits a sweet spot because it functions as both a USB microphone and an XLR microphone.
In short, you can plug it straight into your laptop to record right away, or upgrade to an interface later if you want to get more hands-on with your audio chain. If you do go the interface route, remember that you will need to buy a quality XLR cable to connect the components.
That is why I recommend this specific podcast equipment for those starting out. It is plug-and-play now, and it does not box you in later.
When I am traveling, I switch to a compact two-pack of wireless microphone units from Hollyland. This wireless microphone setup lets me record in person, separate each voice onto its own track, and keep the editing cleaner later.
If the MV7 is over budget right now, these affordable USB mics for podcasters are a much smarter place to start than impulse-buying something flashy.
For those scaling up to a professional video podcast, adding a RODECaster Duo as your primary podcast mixer is a game changer. When paired with a sturdy tripod and a consistent lighting setup, this gear ensures your production value remains high regardless of where you record.
If you want to compare more options across price ranges, this podcast microphone roundup is a helpful sanity check.
Why Local Recording Beats Zoom Every Time
This is where a lot of otherwise solid podcasts fall apart. Someone buys a good mic, then records the interview through Zoom or Google Meet and wonders why the audio sounds thin, compressed, or weirdly distant.
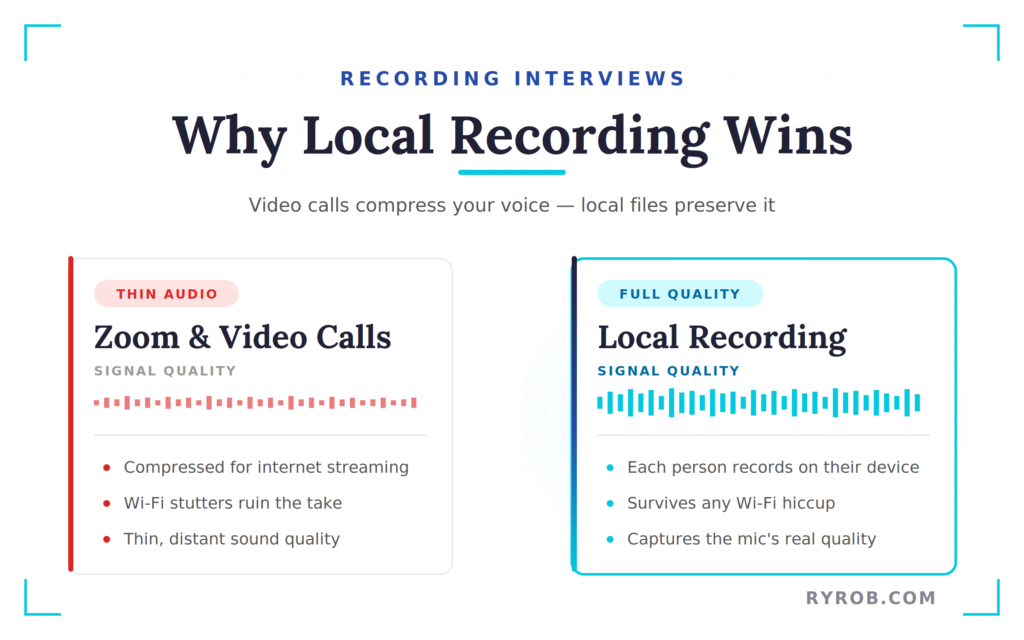
The issue is simple. Video conferencing tools are built for speed and stability, not for preserving rich audio.
By the time your voice gets squeezed through the internet and turned into a call recording, you are not hearing the full quality of your microphone anymore.
Local recording fixes that. Each person records a clean file on their own computer, and the call software is not in charge of the final audio. If your guest’s Wi-Fi stutters for a second, the local file is still intact. That is a huge deal when you are recording interviews you cannot recreate.
How One Tool Replaces a Bunch of Separate Apps
Riverside is the tool that holds this whole setup together for me. I use it to:
- Record the interview
- Edit the episode
- Cut social clips
- Pull transcripts
- Draft show notes
- Publish
That matters because most podcast production headaches come from handoffs. Record here, export there, edit in something else, schedule in another tool, and hope you did not lose a file or forget a step.
The more platforms you add, the more friction you create.
I have used this setup to interview hundreds of founders, authors, entrepreneurs, and other high-level guests. The gear has held up. More importantly, the process has held up.
My Step-By-Step Podcast Interview Workflow
The workflow is the thing that saves me the most time now. The recording part is only one piece of it.
What made the biggest difference was building a system that starts before the guest joins and ends only when the episode is ready to publish.
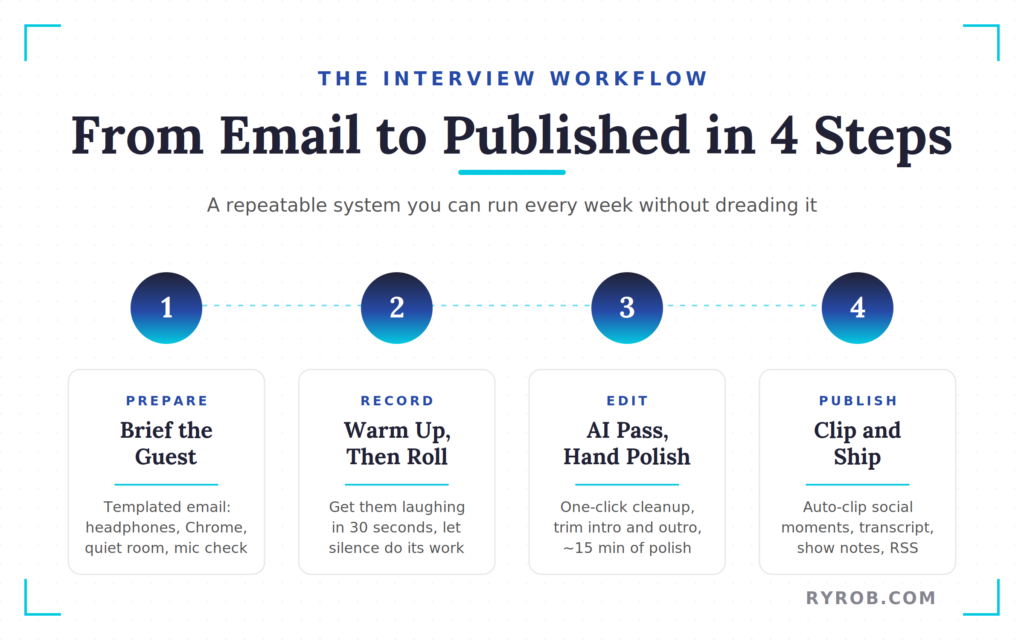
How I Prepare Guests Before We Record
Before every interview, I send the same short email. It includes:
- The join link
- Wear headphones
- Choose a quiet recording environment
- Join through Chrome
- Perform a quick mic check to ensure proper microphone technique
That email takes about two minutes because it is templated. No rewriting. No reinventing the wheel for every guest.
If I need more prep on the guest, I spend around 45 minutes researching and sketching out question buckets. Not a rigid script, just broad lanes like:
- Life
- Work
- Habits
- Lessons learned
That gives the conversation structure without turning it into an interrogation.
Why I Spend the First Few Minutes Getting Guests Comfortable
Once the guest arrives, I do not smash record the second they show up. I spend a few minutes warming them up off the record.
The goal is simple: get them relaxed fast. If I can get a guest laughing in the first 30 seconds, the whole conversation opens up. You can feel it, even through a screen.
Those first few minutes matter more than people think. A tense guest gives short answers. A comfortable guest tells stories.
The Biggest Live Interview Mistake to Avoid
New hosts often talk too much. They jump in too quickly, rush to fill silence, and cut off answers right before they get interesting.
Silence is not dead air if it is leading to a better response. A two or three second pause gives thoughtful guests time to pull up something better than their first surface level answer.
This is one of those small things that changes the whole texture of an interview. If you want better stories, give people room to think.
How I Edit, Clip, and Publish Episodes Faster
Post-production used to be the part of the week I dreaded. I would export audio, drag it into a digital audio workstation, scrub for every um and awkward pause, build clips one at a time, then bounce around different platforms to publish.
That old process could eat four or five hours without breaking a sweat. Now, my entire workflow takes less than two hours from start to finish.
Using AI to Clean Up Audio and Speed Up Edits
Inside Riverside, the first thing I reach for is Magic Audio. It is a one-click cleanup pass that improves the sound without sending me down a rabbit hole of EQ, compression, plugins, and endless fiddling.
Captions are generated automatically, which is a nice bonus. For a video podcast, the editor can also switch between speaker views and split-screen layouts based on who is talking. This ensures I am not manually picking camera angles for the entire duration of the project.
I still do a bit of editing by hand to tighten the intro, trim tangents, and clean up the outro. Even with my specific podcast equipment setup, that is only about 15 minutes of polish rather than hours of tedious cleanup.
Riverside also has an editing assistant called Co-creator, which works like a chat prompt rather than a traditional editor. You can ask it to pull a specific section or tighten a segment to make those cuts inside the project.
That level of automation used to feel impossible unless you hired a dedicated producer.
Turning One Interview Into Social Clips
This part used to be painfully manual as well. Now, the transcript does a lot of the heavy lifting.
Riverside scans the full conversation, finds quotable moments, and creates vertical clips for:
- TikTok
- Instagram Reels
- YouTube Shorts
That alone saves a pile of time because short-form content is valuable, but making it from scratch is a grind.
The part I like most is the viral score. Each clip gets ranked based on how strong the opening hook is and how likely it is to hold attention.
It does not guarantee views, but it gives you a much better starting point than random guessing.
I usually take the top few clips, pair them with quick AI-made thumbnails, and ship them out.
Publishing the Full Episode Without Juggling More Tools
The part that used to feel like busywork is now mostly handled in the same place.
That includes:
- Transcripts
- Show notes
- Timestamp chapter markers
If you use Riverside as your host, the path from recording to publishing gets even shorter. If you use a different provider, those assets still make the last mile much easier.
If you are using a separate host, pick one that is built to manage your RSS feed, episode library, and distribution to Apple Podcasts and Spotify. I break down the best podcast hosting platforms if you want help picking one.
The transcript matters for more than accessibility. If you care about repurposing content, it becomes source material for blog posts, email newsletters, and even keyword-driven content ideas later.
One interview can fuel a lot more than just a single audio file.
What to Upgrade First If You Want Better Podcast Audio
Most people upgrade in the wrong order. They buy a fancier microphone, still hate the sound, and assume they need even more gear.
Nope. Fix the room first.
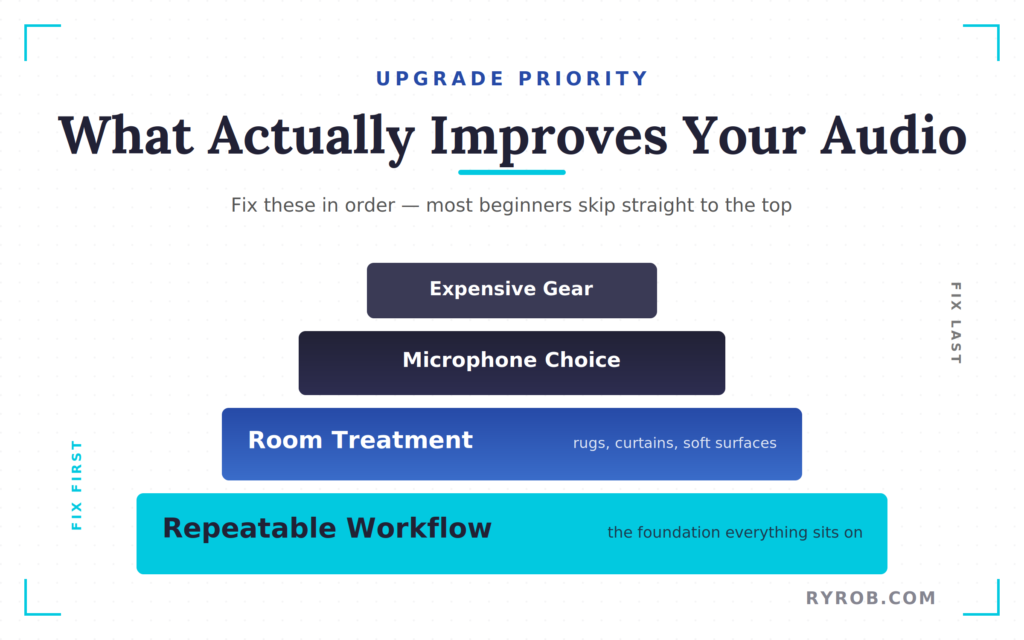
Fix Your Room Before You Buy More Gear
A bare room with hard floors and empty walls will make good gear sound bad because the echo ruins your audio. If you want to achieve professional sound quality, your environment matters more than your hardware.
Using acoustic treatment is the most effective way to improve your home studio. A thick rug helps, curtains help, and even a room with more soft surfaces and less empty space can make a noticeable difference.
You do not need a full professional buildout, but you do need to reduce the bounce in your sound.
A $99 mic in a treated room will usually beat a $400 mic in an echo chamber.
That is the upgrade most beginners skip, and it is why they keep chasing equipment that never solves the real problem.
When It Makes Sense to Buy Pro-Level Gear
Once you have published a couple dozen episodes, you are still enjoying the show, and it is beginning to pay for itself, then you can start thinking about bigger upgrades.
That is when gear like the following can make sense:
- The SM7B
- A high-quality interface
- XLR cables
- A more advanced signal chain
By then, you will know your format better, know your home studio setup better, and have enough reps to tell whether the improvement is worth the cost.
Until then, keep it simple. Fancy gear is fun, but a reliable system is what gets you to episode 50.
FAQs About Podcast Setup and Workflow
Here are additional questions you might ask.
Do I Need an Expensive Microphone to Start a Podcast?
No, you do not need an expensive microphone to start a podcast.
You need a decent USB microphone, a quiet room, and a consistent process. You do not need to overspend on high-end podcast equipment when you are just beginning.
A used starter mic is often more than enough to get your first episodes out the door, as the priority early on is proof of concept rather than studio perfection.
Why Does My Podcast Sound Bad on Zoom?
Your podcast sounds bad on Zoom because Zoom recordings are compressed for video calls rather than polished audio production.
You are hearing an internet-friendly version of your voice, which means your sound quality often suffers compared to what your microphone is actually capable of capturing.
If you want cleaner interview audio, use a tool that records each participant locally.
Should I Use USB or XLR for Podcasting?
If you are starting out, a USB microphone is the easiest move. It is faster to set up, cheaper, and more than sufficient for most new shows.
But, if you prefer a professional setup, an XLR microphone offers more flexibility for complex audio chains. A hybrid mic like the MV7 is a great middle ground, as it gives you room to grow later without forcing you to buy extra gear now.
Should I Use In-Ear Monitors?
Yes, in-ear monitors are a great choice if you want to keep your setup clean and comfortable.
They provide a discrete alternative to traditional wired headphones, helping you monitor your voice clearly during long recording sessions without the bulk of over-ear sets.
How Long Should Podcast Editing Take?
Podcast editing should not take your whole day every week.
It depends on your format, but if one episode is taking five hours or more to clean up, your production stack is likely too fragmented. A tighter workflow, better recording habits, and fewer tools can cut that time down in a significant way.
Final Thoughts on My Podcast Setup in 2026
The biggest shift in my podcast setup wasn’t buying better gear. It was building a workflow I could repeat without friction every single week.
Ultimately, even the most expensive podcasting bundle or a high-end podcast setup is only as good as the system behind it. A good mic helps, and a better room helps, but the thing that makes podcasting sustainable is having one clear process for recording, editing, clipping, and publishing without bouncing across a dozen tools.
If your current workflow feels messy, do not start by shopping for new podcast equipment. Start by making the path to a published episode shorter. Focus on your process first, and your show will be better for it.
Record, Edit, and Publish Podcasts in One Place with Riverside
Stop juggling multiple tools every time you produce an episode. Riverside helps podcasters record local audio and video, generate AI-powered transcripts, create social clips, and publish content from a single streamlined platform. Get 1 free month of Riverside with the code RYAN 👇
Disclaimer: This story is auto-aggregated by a computer program and has not been created or edited by budgetbuddy.
Publisher: Source link
Publisher: Source link